
Countryside Inn Cards
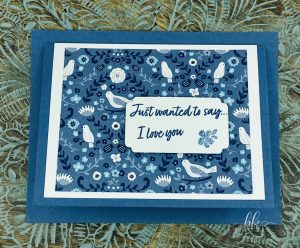
Today I made cards using the Countryside Inn Designer Series Paper. The third card I CASED from a friend who sent me a card this week. Get inspired with the charming blue-and-white countryside designs in the Countryside Inn 12″ x 12″ Designer Series Paper. Inspired by fine china and wallpaper patterns, this paper includes gorgeous florals, woodland animals, nature, and ceramic designs. Make blue and white the new trend on your projects!
The instructions are below but if you want to watch the step by step video, here it is.
If you would like to try this project, please visit my store for any supplies you need.
SUPPLIES Card 1:
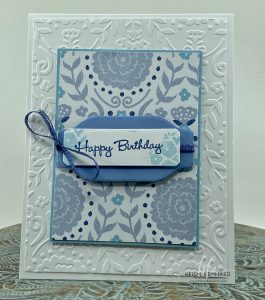
Stamp Set: Country Bouquet
Paper: Basic White Cardstock, Thick Basic White Cardstock, Balmy Blue Cardstock, Boho Blue Cardstock, Countryside Inn Designer Paper
Ink: Misty Moonlight Ink Pad, Balmy Blue Ink Pad
Embellishment: Starry Sky Metallic woven Ribbon
Tools: Trimmer, Tombo Liquid Glue, Countryside Corners Dies, Something Fancy Dies, Countryside Blossoms Embossing Folder
Instructions:
- Cut Thick Basic White Cardstock 4 1/4″ x 11″, scored at 5 1/2″ for base.
- Cut Basic White cardstock to 4″ x 5 1/4″. Emboss with Countryside Blossoms Folder and adhere to card base.
- Cut Designer Series Paper to 2-7/8″ x 3-7/8″ and layer on Balmy Blue Cardstock cut to 3″ x 4″. Adhere panel to card with Dimensionals.
- Die-cut label from Boho Blue Cardstock with Something Fancy Dies. Wrap Starry sky Metallic Ribbon around label, tie a bow and adhere to panel.
- Die-cut label from Basic White Cardstock with Countryside Corners Dies. Stamp sentiment in Misty Moonlight and flowers in Balmy Blue. Adhere to Boho Blue label with Dimensionals.
SUPPLIES Card 2:
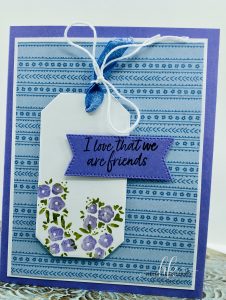
Stamp Set: Country Bouquet
Paper: Basic White Cardstock, Countryside Inn Designer Paper, Highland Heather Cardstock, Old Olive Cardstock
Ink: Highland Heather and Old Olive Stampin’ Write Markers, Momento Ink
Embellishment: Boho Blue Textured Ribbon, Baker’s Twine Essentials Pack
Tools: Trimmer, Tombo Liquid Glue, Countryside Corners Dies, Stylish Shapes Dies,
Instructions:
- Cut Highland Heather Cardstock to 5-1/2″ x 8-1/2″ , score and fold at 4-1/4″
- Cut Designer Series Paper to 3-3/4″ x 5″, layer on Basic White Cardstock cut to 3-7/8″ x 5-1/8″ and adhere panel to card base.
- Die-cut label from Basic White Cardstock with Countryside Corners Dies. Stamp flowers in Old Olive/Highland Heather Stampin’ Write Markers.
- Punch hole into label with hole punch. Pull through a piece of Boho Blue Ribbon and secure with a bow of White Baker’s Twine. Adhere label to card with Dimensionals.
- Die-cut banner from Highland Heather Cardstock with Stylish Shapes Dies. Stamp sentiment in Memento Ink.
- Die-cut banner from Old Olive Cardstock with Countryside Corners Dies, cut in half and adhere to the backside of sentiment banner. Adhere sentiment banner to label with Liquid Glue, and add Dimensionals to right end.
SUPPLIES Card 3:
Stamp Set: Country Bouquet
Paper: Basic White Cardstock, Countryside Inn Designer Paper, Misty Moonlight Cardstock
Ink: Misty Moonlight
Embellishment: NA
Tools: Trimmer, Tombo Liquid Glue, Countryside Corners Dies
Instructions:
- Cut Misty Moonlight cardstock to 4-1/4″ x 5-1/2″. Cut second piece of Misty Moonlight to 4-7/8″ x 3-5/8″.
- Cut Basic White Cardstock to 4-1/2″ x 7″ and score at 3-1/2″. Fold and adhere to Misty Moonlight Base.
- Adhere second piece of Misty Moonlight to back of Basic White Front. Adhere Countryside Inn DSP cut at 4″ x 3-1/4″ to front panel.
- Die-cut Banner from Basic White with Countryside Corners Dies.
- Stamp sentiment with Misty Moonlight and adhere to front with Dimensionals.
Stay Connected:
Join me Live every Wednesday night at 7pm EST on FaceBook or YouTube.
You can Shop My Store Here
Join My Team Here.
#Stampinup #helenkennard.com #CountryBouquet Stamp Set #CountrysideInnDesingerSeriesPaper

Leave a Reply