
Be Jolly Christmas Card
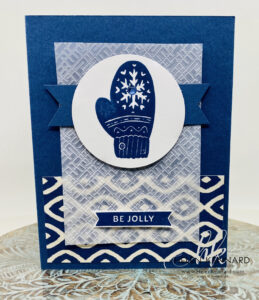
Today I made a Be Jolly Christmas Card using Celebrate With Tags Stamp Set from Stampin’Up! This is the first card in my Christmas Series that starts this month. What better way to de-stress the holiday season than to start your Christmas Cards Now! Let’s destress and start tonight.
The instructions are below for this card but if you want to watch the step by step video, here it is.
If you would like to try this project, please visit my store for any supplies you need.
SUPPLIES :
Stamp Set: Celebrate With Tags
Paper: Basic White Cardstock, Misty Moonlight Cardstock, Vellum Cardstock, Delightfully Eclectic Designer Series Paper
Ink: Misty Moonlight Ink Pad,
Embellishment: Stampin’ Dimensionals, Mini Glue Dots, 2023 – 2025 In Color Dots
Tools: Stampin’ Cut & Emboss Machine, Basic 3D embossing Folder, 2 3-8″ Circle Punch
Instructions:
- Cut Misty Moonlight Cardstock 8-1/2 x 5-1/2 and score at 4-1/4.
- Cut Designer Series Paper at 2″ x 4″ and adhere to bottom of base card with Seal Adhesive.
- Cut Vellum 3″ x 4 1/4″ and emboss with the Basic 3D embossing folder. Attach to base card with Seal Adhesive.
- Cut Misty Moonlight Cardstock at 1/2″ x 2-1/2″. Banner each end and adhere with Dimensionals.
- Punch circle with Basic White Cardstock. Stamp image with Misty Moonlight. Adhere with Dimensionals.
- Stamp sentiment with Misty Moonlight and fussy cut. Adhere with Dimensionals.
- Decorate with In Color Dots.
Let’s Stay Connected:
Join me Live every Wednesday night at 7pm EST on FaceBook or YouTube.
You can Shop My Store Here
Join My Team Here.
#Stampinup #helenkennard.com #Handstampedcards #celebratewithtags #christmascards

Leave a Reply