

Most Adored & Meandering Meadows Cards
Today I made two cards using the Most Adored & Meandering Meadows Designer Series Paper from Stampin’Up! The Most Adored 12″ x 12″ Specialty Designer Series Paper has luscious pinks and gilded golds, with marbled and plaid designs to create baby shower or wedding invitations. This Specialty Paper is Free with a $50 purchase in my store. The Meandering Meadows Designer Series Paper is 6X6 Designer Series Paper and uses thick brushstrokes, vivid colors, and bright light to transport you to a scene that’s sure to add movement and composition to your handmade cards. The instructions are below for both of these cards. If you want to watch the step by step video, here it is.
If you would like to try this project, please visit my store for any supplies you need. Sign up for my newsletter and receive FREE tutorials every month.
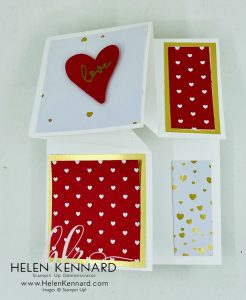
Most Adored Card
Stamp Set: Sentimental Park
Paper: Basic White Thick Cardstock, Real Red Cardstock, Gold Foil Paper, Most Adored Specialty Designer Series Paper
Ink: Real Red Ink Pad, Versamark Ink Pad, Gold Stampin’ Emboss Powders
Embellishment: NA
Tools: Country Bouquet Punch, Stampin’ Trimmer
Directions:
- Cut Thick White Cardstock to 7″ x 8-1/4″ . Score 7″ side at 2-3/4″ and the 8-1/4″ side at 2-3/4.
- On the 7″ side, make a Mark at the 1-1/2″ Top Rt Side. Then make a mark on the 8-1/4′ side at the 5-1/2″ from the top left side. Score from both Marks diagonally. (See video) Burnish ALL score marks both ways to make it flexible and easy to fold.
- Cut Designer series Paper at 1-1/4″ x 5-1/4″ and adhere to inside right side.
- Cut Gold Foil matt for top right at 1-1/4″ x 2-1/2″. Cut Designer Series Paper for top right at 1″ x 2-1/4′ and adhere together. Then adhere to base top right.
- Cut Designer Series Paper for Top Left at 2-1/2″ x 2-1/2″ and adhere to top left base. Punch Real Red heart with Country Bouquet Punch, Stamp “love” with VersaMark Ink and heat emboss with Gold Embossing Powder. Adhere to top left with Dimensional.
- Cut Gold Foil Matt for Bottom Left at 2-1/2″ x 2-1/2″ and adhere to bottom left base card. Cut Designer Series Paper at 2-1/4″ x 2-1/4″ and adhere to bottom left.
- Stamp “You” on inside with Real Red Ink.
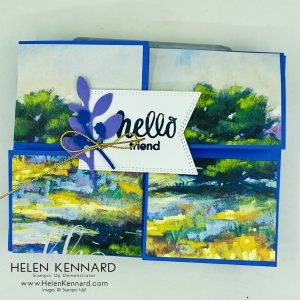
Meandering Meadows Card
Stamp Set: December’s Paper Pumpkin Stamp Set
Paper: Orchid Oasis Cardstock, Basic White Cardstock, Meandering Meadows Designer Series Paper, Highland Heather Cardstock
Ink: Momento Ink Pad
Embellishment: Simply Elegant Trim
Tools: Bough Punch, Nested Essentials Dies
Directions:
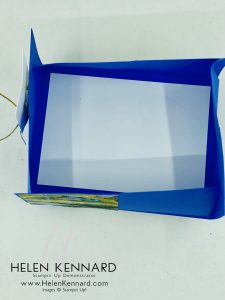
- Cut Orchid Oasis Cardstock at 8-1/2″ x 5-1/2″. Score at 2-1/8″ on each side on the 8-1/2″ side. Fold and burnish scorelines.
- Cut Orchid Oasis Cardstock 4-1/4″ x 11″. Score at 2-3/4″ x 8-1/4″ on the 11″ side. Fold and burnish scorelines.
- Layer both Orchid Oasis Cardstock 8-1/2″ x 5-1/2 and 4-1/4″ x 11″ together. (see video if needed).
- Cut Basic White Cardstock 4″ x 5-1/4″. Adhere to the inside of the card.
- Adhere Designer Series Paper cut 2″ x 2-3/4″ to each flap in sequence. Then fold card shut like closing a box.
- Die cut label from Nested Essentials in Basic White. Stamp sentiment in Momento Ink.
- Punch Highland Heather and Orchid Oasis with Bough Punch. adhere the Boughs to the label with Glue Dots. Adhere Simply Elegant Trim bow on top of the sprigs with Glue Dots.
- Add dimensionals to the left half of the label and stick on Only the top left panel so card can open and close.
Let’s Stay Connected:
Join me Live every Wednesday night at 7pm EST on FaceBook or YouTube.
You can Shop My Store Here
Join My Team Here.
#Stampinup #helenkennardcom #Handstampedcards #stampinuptutorials #fancyfoldcards #mostadored #meanderingmeadows. #boxtopfoldcard

Leave a Reply