


Trusty Tools Cards
Today I made two Trusty Tools cards using the Trusty Tools Bundle from Stampin’Up! We all have people in our life who deserve recognition! The stamps, sentiments, and dies in this bundle fit nicely together to make fun masculine or feminine projects. The instructions are below for these cards. If you want to watch the step by step video of two of the cards, here it is.
If you would like to try this project, please visit my store for any supplies you need. Sign up for my newsletter and receive FREE tutorials every month.
Trusty Tools Card #1
Stamp Set: Trusty Tools
Paper: Crumb Cake Cardstock, Basic White Cardstock
Ink: Crumb Cake Ink Pad, Real Red Ink Pad, Tuxedo Black Memento Ink Pad, Stampin’ Blends: Real Red, Daffodil Delight, Boho Blue, Smoky Slate, Pecan Pie
Embellishment: Stampin’ Dimensionals., Mini Glue Dots, Gold Faux Leather Trim, Adhesive-Backed Cork Rounds
Tools: Stamin’ Cut & Emboss Machine, Trusty Tools Dies, Basics 3D Embossing Folders
Directions:
- Cut Crumb Cake Cardstock to 5-12″ x 8-1/2″ and fold in half.
- Cut Crumb Cake Cardstock to 4″ x 5-1/3″, emboss with Basics 3D Folder and adhere to card base.
- Die-cut tool box from Crumb Cake Cardstock with Trusty Tools Dies and adhere handle to card. Stamp DAD on second part in Crumb Cake and adhere to card. Sponge the edges with Crumb Cake ink and a Blending Brush.
- Stamp tools on Basic White Cardstock in Memento and color with Stampin’ Blends. Die-cut images with Trusty Tools Dies and adhere to card, tucked inside the tool box.
- Stamp sentiment on Base White Cardstock in Real Red. Trim words apart and adhere to card with Dimensionals.
- Loop a piece of Gold Faux Leather trim and adhere to card with Mini Glue Dots, tucked behind tools.
- Embellish tool box with Cork Rounds.
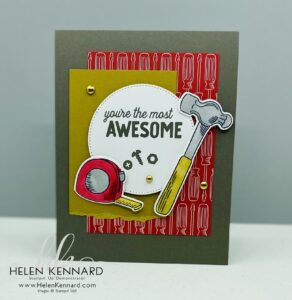
Trusty Tools Card #2
Paper: Trusty Tools (SAB) Or Flowering Zinnias Designer Series Paper, Pebbled Path Cardstock, Basic White Cardstock, Wild Wheat Cardstock
Ink: Pebbled Path Ink Pad, Tuxedo Black Memento Ink Pad, Stampin’ Blends: Real Red, Daffodil Delight, Wild Wheat, Smoky Slate
Embellishment: Stampin’ Dimensionals., Mini Glue Dots, Adhesive-Backed Cork Rounds
Tools: Stampin’ Cut & Emboss Machine, Trusty Tools Dies, Stylish Shapes Dies
Directions:
- Cut Pebbled Path Cardstock to 4-1/4″ x 11″ and fold in half.
- Cut Designer Series Paper to 3″ x 4-1/4″ and adhere to card base.
- Cut Wild Wheat Cardstock to 2-1/4″ x 4″, tear off one short side and layer on top of Designer Series Paper.
- Die-cut circle from Basic White Cardstock with Stylish Shapes Dies and stamp sentiment in Pebbled Path. Stamp nuts and bolts in Pebbled Path and adhere to card with Dimensionals.
- Stamp tools on Basic White Cardstock in Memento and color with Stampin’ Blends. Die-cut images with Trusty Tools Dies adhere to card with Dimensionals.
- Embellish card with Cork Rounds.
Trusty Tools Card #3
Paper: Trusty Tools (SAB) Or Flowering Zinnias Designer Series Paper, Basic White Thick Cardstock, Basic White Cardstock, Basic Gray Cardstock, Old Olive Cardstock
Ink: Basic Gray Ink Pad
Embellishment: Stampin’ Dimensionals., Mini Glue Dots
Tools: Stampin’ Cut & Emboss Machine, Trusty Tools Dies, Thoughtful Expressions Dies
Directions:
- Cut Basic White Thick Cardstock to 4-1/4″ x 11″ and fold in half.
- Cut Designer Series Paper to 2-3/4″ x 4-3/4″, layer on Basic Gray Cardstock cut to 3″ x 5″ and adhere panel to card base.
- Cut Designer Series Paper to 4″ x 3/4″, trim off both ends at an angle and adhere to card.
- Die-cut label from Basic White Cardstock with Thoughtful Expressions Dies and adhere to card with Dimensionals.
- Cut Basic White Cardstock to 3″ x 3/4″ and stamp sentiment in Basic Gray. Trim off both ends at an angel and adhere to card with Dimensionals.
- Die-cut electric screwdriver parts from Basic Gray/Old Olive Cardstock with Trusty Tools Dies, assemble tool and adhere to label.
- Die-cut nuts and bolts from Basic Gray Cardstock with Trusty Tools Dies and adhere to card with Mini Glue Dots.
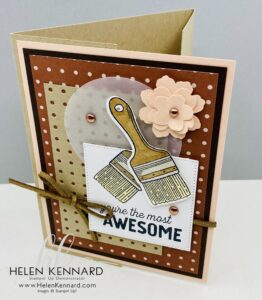
Trusty Tools Card #4
Paper: Trusty Tools (SAB) Or Flowering Zinnias Designer Series Paper, Crumb Cake Cardstock, Early Espresso Cardstock, Petal Pink Cardstock, Basic White Cardstock, Vellum Cardstock
Ink: Tuxedo Black Memento Ink Pad, Stampin’ Blends: Crumb Cake, Pecan Pie, Ivory Blends
Embellishment: Stampin’ Dimensionals., Mini Glue Dots, Adhesive-Backed Cork Rounds, Gold Faux Leather Trim
Tools: Stamin’ Cut & Emboss Machine, Trusty Tools Dies, Stylish Shapes Dies, 2 3/8″ Circle Punch, Petal Park Builder Punch
Directions:
- Cut Crumb Cake Cardstock to 5-1/2″ x 8-1/2″. Score and gate-fold long side at 2-1/8″ from both ends.
- Cut Designer Series Paper to 4″ x 2″ and adhere to the inside.
- Cut Basic White Cardstock to 3-1/2″ x 5″ and layer on top of Designer Series Paper inside.
- Cut Designer Series Paper to 3-1/2″ x 4-3/4″ and layer on Early Espresso Cardstock cut to 3-3/4″ x 5″, Adhere panel to Petal Pink Cardstock cut to 4″ x 5-1/4″.
- Wrap Gold Faux Leather trim around panel and tie a bow, then adhere to one card front panel with Dimensionals,. Stretch out the leather trim to make it softer.
- Cut Crumb Cake Cardstock to 2″ x 4″, die-cut “pegboard” with Trusty Tools dies and adhere to panel, tucked behind trim.
- Punch out circle from Vellum Cardstock with 2-3/8″ Circle Punch and layer on top.
- Die-cut square from Basic White Cardstock with Stylish Shapes Dies and stamp sentiment in Memento. Stamp paint brush in Memento and color with Stampin’ Blends, then adhere to card with Dimensionals.
Let’s Stay Connected:
Join me Live every Wednesday night at 7pm EST on FaceBook or YouTube.
You can Shop My Store Here
Join My Team Here.
#Stampinup #helenkennardcom #Handstampedcards #stampinuptutorials #Trustytoolsstampset #floweringzinniasdesignerseriespaper #fathersdaycards

Leave a Reply