
BEE My Valentine Card
Today I made two BEE My Valentine Cards using the Bee Mine Suite from Stampin’Up! This suite is filled with bright colors and unique patterns you can mix and match. The darling bee images were hand designed with symmetrical shapes for versatility and have a coordinating punch. The instructions for the Valentine Cards are below. If you want to watch the step by step video, here it is.
If you would like to try this project, please visit my store for any supplies you need. Sign up for my newsletter and receive FREE tutorials every month.
SUPPLIES :
Stamp Set: Bee My Valentine
Paper: Basic White Cardstock, Pool Party Cardstock, Petal Pink Cardstock, Bee Mine Designer Series Paper
Ink: Sweet Sorbet Ink Pad
Embellishment: Adhesive-Backed Hearts & Flowers
Tools: Bee Builder Punch
Directions:
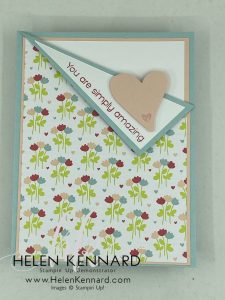
- Cut Pool Party Cardstock to 5-1/2″ x 8-1/2″ and fold in half. Score front angle down to 1-3/4″ to nothing at fold.
- Cut Petal Pink Cardstock to 4″ x 5-3/8″, angel cut down 1-3/4″ to nothing at opposite corner and adhere to Pool Party base.
- Cut designer Series Paper to 3-7/8″ x 5-1/4″, angle cut down 1-3/4″ to nothing at opposite corner and adhere to Petal Pink layer.
- Cut Basic White Cardstock to 3-5/8″ x 1-1/2″ and cut in half diagonally. Stamp sentiment in Sweet Sorbet and adhere to back folded corner.
- Punch heart with Bee Builder Punch and layer on card with Dimensionals.
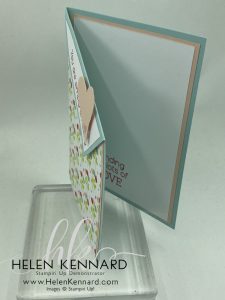
- Cut Basic White carsick to 3-7/8″ x 5-1/8th. Stamp sentiment in Sweet Sorbet. Layer on Petal Pink Cardstock cut to 4″ x 5-1/4″ and adhere panel. to the inside of the card.
- Embellish card with Adhesive-Backed Hearts & Flowers.
For You Valentine Card
Stamp Set: Bee My Valentine
Paper: Basic White Thick Cardstock, Basic White Cardstock, Bee Mine Designer Series Paper, Daffodil Delight Cardstock
Ink: Momento Ink Pad
Embellishment: Adhesive-Backed Hearts & Flowers, Sweet Sorbet 1/4″ Bordered Ribbon
Tools: Very Best Trio Punch
Directions:
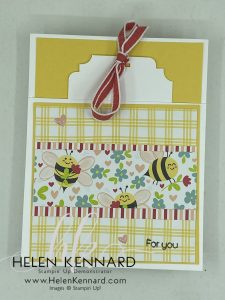
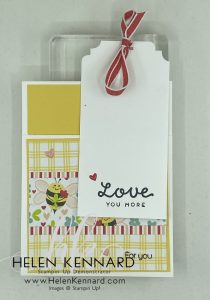
- Cut Basic White Thick Cardstock at 4-1/4″ x 9-1/2″. Score and fold long side at 5-1/2″.
- Cut Daffodil Delight Cardstock to 4″ x 2″ and adhere to the top on the inside of the card.
- Apply adhesive to the inside of the card front (Only on the sides) and glue down card front to create pocket.
- Cut Designer Series Paper to 3-7/8″ x 3-5/8″ and stamp sentiment in Momento Ink. Layer on Daffodil Delight Cardstock cut to 4″ x 3-3/4″ and adhere panel to card front.
- Cut Designer Series Paper to 3-7/8″ x 1-3/8″ (Bees) and 3-7/8″ x 1-3/4″ (strips). Layer both pieces and adhere to card front.
- Cut Basic White Thick Cardstock to 2-1/2″ x 5″ and punch top with Very Best Trio Punch. Stamp sentiment in Sweet Sorbet Ink.
- Thread ribbon through tag hole and tie a bow.
- Embellish card with Adhesive-Backed Hearts & Flowers.
Let’s Stay Connected:
Join me Live every Wednesday night at 7pm EST on FaceBook or YouTube.
You can Shop My Store Here
Join My Team Here.
#Stampinup #helenkennard.com #Handstampedcards #Beemyvalentinestampset #Valentinecards

Leave a Reply