
-
- Embossing Paste on Holographic Specialty Paper

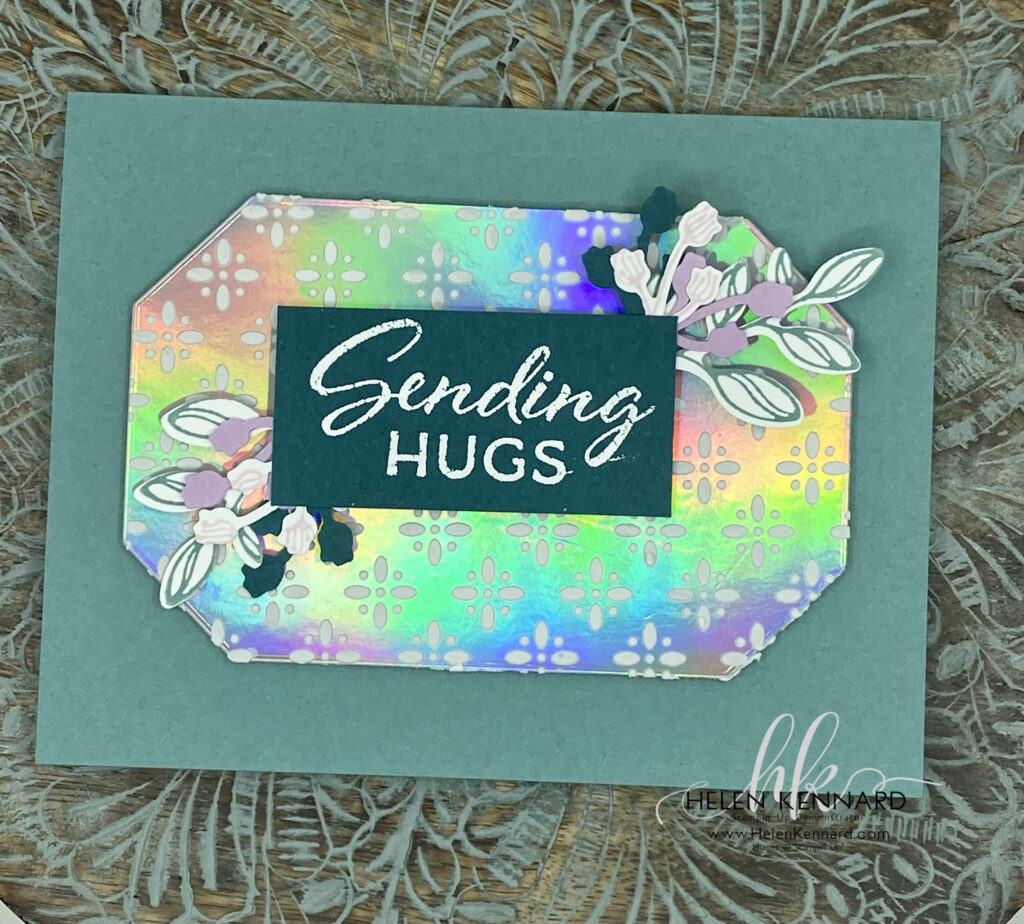
Embossing Paste with Holographic Specialty Paper
Today I made a card using Embossing Paste on Holographic Specialty Paper from Stampin’Up! This technique is stunning and surprisingly easy! I’m CASEING it from Stampin’Up! Facebook Page. Please give it a try.
The instructions are below for this card but if you want to watch the step by step video, here it is.
If you would like to try this project, please visit my store for any supplies you need.
SUPPLIES :
Stamp Set: Layering Leaves
Paper: Basic White Cardstock, Lost Lagoon Cardstock, Holographic Specialty Paper, Pretty Peacock Cardstock, Fresh Freesia Cardstock
Ink: VersaMark Ink, Basic Stampin Emboss Powders (White), Bubble Bath Ink Pad, Pretty Peacock Ink Pad
Embellishment: Stampin’ Dimensionals, Mini Glue Dots
Tools: Stampin’ Cut & Emboss Machine, Countryside Corners Dies, Bough Punch, Heat Tool, Embossing Paste, Palette Knives
Instructions:
- Cut Lost Lagoon Cardstock 8-1/2 x 5-1/2 and score at 4-1/4.
- Die cut Silver Holographic paper with 2nd largest Countryside Corners Die.
- Apply Embossing Paste with Palette Knives over the Artistic Mix Decorative Mask. Allow to dry.
- Stamp sentiment with Versamark on Pretty Peacock Cardstock and heat emboss with White Embossing Powder.
- Stamp 2 large leaf prints with Pretty Peacock Ink on Basic White and punch out with Bough Punch. Stamp 2 small Bubble Bath flowers on Basic White Cardstock and punch out. Punch two Pretty Peacock and two Fresh Freesia small boughs. Adhere all to back of sentiment layer. Layer to the Holographic layer with Dimensionals when dried. Adhere Holographic layer to base with Dimensionals.
Let’s Stay Connected:
Join me Live every Wednesday night at 7pm EST on FaceBook or YouTube.
You can Shop My Store Here
Join My Team Here.
#Stampinup #helenkennard.com #LayeringLeaves #EmbossingPaste #holographicspecialtypaper #ArtisicDecorativemask

Leave a Reply