
Gift Card Holders
Gift Card Holders
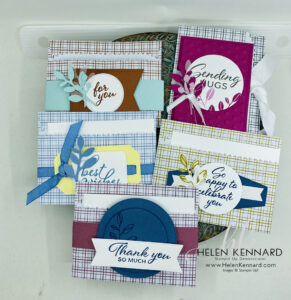
Today I made Gift Card Holders using the new In Color Treat Bags from Stampin’Up! These cute little bags are customizable and perfect for packaging cookies, cards, small gifts, or other treats. The bags can also be cut apart and used as a layering piece on cards, gift tags, or other paper crafting projects.
The instructions are below for one Gift Card Holder but if you want to watch the step by step video, here it is.
If you would like to try this project, please visit my store for any supplies you need.
SUPPLIES:
Paper: 2023 – 2025 In Color Treat Bags, Basic White Cardstock, Misty Moonlight Cardstock, Textured Shimmer Paper
Ink: Misty Moonlight Ink Pad, Wild Wheat Ink Pad
Embellishment: Harringbone ribbon
Tools: Trimmer, Tombo Liquid Glue, Nested Essentials Dies, Bough Punch, 2″ Circle Punch, Banners Pick A Punch
Instructions:
- Score and fold treat bag on the long side 3 3/4″ from sealed end and glue down the sides
- Cut Basic White Cardstock to 4 1/4″ x 3 1/4″ and slide into pocket.
- Die-cut label from Misty Moonlight Cardstock with Nested Essentials Dies (2nd smallest) and adhere to treat bag front.
- Cut Textured Shimmer Paper to 4″ x 1/2″. Trim both ends with Banners Pick A Punch and adhere to Misty Moonlight label.
- Punch out circle from Basic White Cardstock with 2″ Circle Punch, stamp sentiment in Misty Moonlight and adhere on top of banner with Dimensionals.
- Stamp leaves outline on Basic White Cardstock in Wild Wheat, then stamp filling in Wild Wheat (stamp off on scrap paper first for lighter shade) Punch out image with Bough Punch then adhere to banner.
- Punch out small bough from Basic White Cardstock with bough Punch and layer on top with Mini Glue Dots.
- Layer individual strings pulled from Herringbone Ribbon, Tie a bow and adhere to boughs with Mini Glue Dots.
Let’s Stay Connected:
Join me Live every Wednesday night at 7pm EST on FaceBook or YouTube.
You can Shop My Store Here
Join My Team Here.
#Stampinup #helenkennard.com #Giftcardholders #InColortreatbags

Leave a Reply