
Today I made a Hello Friend – Charming Duck Pond card using this bundle from Stampin’Up! I had the inspiration from fellow demonstrator, Ange McKay.
The instructions are below for this card. If you want to watch the step by step video, here it is.
If you would like to try this project, please visit my store for any supplies you need. Sign up for my newsletter and receive FREE tutorials every month.
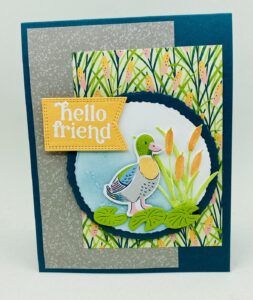
Hello Friend – Charming Duck Pond Card
Stamp Set: Charming Duck Pond
Paper: Pretty Peacock Cardstock, Basic White Cardstock, Unbounded Beauty Designer Series Paper
Ink: Versmark Ink Pad, Pool Party Ink Pad, Peach Pie Marker, Granny Apple Green Marker
Embellishment: White Embossing Powder, Dappled Dots
Tools: Stampin’ Cut & Emboss Machine, Charming Duck Pond Dies, Nested Essential Dies, Deckled Circles Dies, Blending Brushes
Directions:
- Cut Pretty Peacock Cardstock to 4-1/4″ x 11″ and score and fold at 5-1/2″.
- Cut DSP layer 1 to 5-1/4″ x 3″ and layer 2 to 3″ x 4-1/2″. Adhere to base with Seal.
- Cut Basic White Cardstock with Deckled Circle #6 from smallest and Pretty Peacock with Deckled Circle #7 from smallest. Apply Pool Party Ink with Blending Brushes to bottom half of Basic White. Sprinkle drops of water to this part of panel and allow to dry. Adhere Basic White circle to Pretty Peacock circle and adhere to base with Dimensionals.
- Die cut Lily Pads in Granny Apple Green, Bullrushes in Basic White and Banner with Peach Pie Cardstock.
- Color bullrush in Granny Apple Green and Peach Pie Markers. Die cut duck from DSP. Assemble on circle with Dimensionals. and Glue dots.
- Stamp sentiment in Versamark and heat emboss with White Embossing Powder. Adhere to card base with Dimensionals.
- Adhere Dappled Dots to card.
Let’s Stay Connected:
Join me Live every Wednesday night at 7pm EST on FaceBook or YouTube.
You can Shop My Store Here
Join My Team Here.
#Stampinup #helenkennardcom #Handstampedcards #stampinuptutorials #charmingduckpondsstampset

Leave a Reply