


Planted Paradise & Watercolor Melon Cards
Today I made two cards using the Planted Paradise & Watercolor Melon Stamp Sets from Stampin’Up! The Planted Paradise Stamp Set is a Reversibles stamp set; it includes specialized photopolymer stamps that allow you to stamp with both sides of the stamp for greater versatility. The Watercolor Melon Stamp set is a FREE stamp set during Saleabration with a $50 purchase. The instructions are below for both of these cards. If you want to watch the step by step video, here it is.
If you would like to try this project, please visit my store for any supplies you need. Sign up for my newsletter and receive FREE tutorials every month.
Planted Paradise Card
Stamp Set: Planted Paradise
Paper: Basic White Cardstock, Highland Heather Cardstock, Fresh Freesia Cardstock , Gorgeous Grape Cardstock
Ink: Fresh Freesia Ink Pad, Highland Heather Ink Pad, Gorgeous Grape Ink Pad
Embellishment: Adhesive Backed Cork Rounds
Tools: Stampin’ Trimmer, Stampin’ Cut & Emboss Machine, Painted Texture 3D Embossing Folder
Directions:
- Cut Fresh Freesia Cardstock to 5-1/2″ x 8-1/2″, score at 4-1/4″ and burnish.
- Cut Highland Heather Cardstock to 3-1/2″ x 3-1/2″ and emboss with the Painted Texture 3D Folder. Adhere to card base, left of center.
- Cut Gorgeous Grape Cardstock o 3″ x 3″, Adhere to base with Dimensionals, right of center
- Cut Basic White Cardstock to 2-7/8 x 2-7/8″ . Stamp plant vase in Fresh Freesia and plants in Fresh Freesia 1st & 2nd generation and Highland Heather, on left side. Stamp flowers on right side of cardstock with 1st & 2nd generation Fresh Freesia and Highland Heather.
- Stamp vase in Gorgeous Grape on Basic White Scrap and fussy cut out. Adhere to base with Dimensionals.
- Cut Fresh Freesia 1/2″ x 2-3/4″. Stamp sentiment in Gorgeous Grape Ink. Adhere to base with Dimensionals.
- Embellish with Adhesive Backed Cork Rounds.
- Cut Basic White 4″ x 5-1/4″ and adhere to inside. Stamp flower vase and flowers on inside.
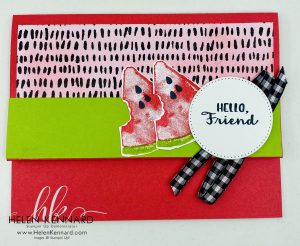
Watercolor Melon Card
Stamp Set: Watercolor Melon, Hope You Know
Paper: Sweet Sorbet Cardstock, Basic White Cardstock, Zoo Crew Designer Series Paper, Granny Apple Green Cardstock
Ink: Momento Ink Pad, Sweet Sorbet Ink Pad, Granny Apple Green Ink Pad
Embellishment: Black & White Gingham Ribbon
Tools: Stampin’ Cut & Emboss Machine, Modern Oval Punch, Stylish Shapes Dies, Blending Brushes
Directions:
- Cut Sweet Sorbet Cardstock to 5-1/2″ x 8-1/2″. Score and z-fold long side at 1-1/4″ and 4-1/4″.
- Cut Granny Apple Green to 5-1/2″ x 1-1/4″ and adhere to small card front section.
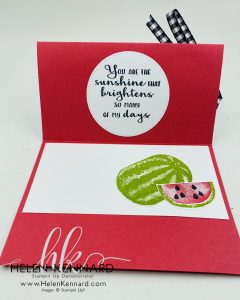
- Cut 2 pieces of Designer Series Paper to 5-1/4″ x 2-3/4″ and add Sweet Sorbet with Blending Brushes. Adhere one to larger card front section and the other to the inside.
- Cut Basic White Cardstock to 5-1/4″ x 2-3/4″ and adhere to the inside.
- Die-cut circle from Basic White Cardstock with Stylish Shapes Dies, stamp sentiment in Memento and adhere to the inside on top of Designer Series Paper.
- Stamp watermelon on Basic White Cardstock in Granny Apple Green, Punch out with Modern Oval Punch and adhere to Basic White Layer on the inside. Stamp watermelon slice on Basic White Cardstock in Sweet Sorbet/Granny Apple Green/ Memento. Punch out with Modern Oval Punch, trim down and adhere to the inside.
- Stamp watermelon slices on Basic White Cardstock in Sweet Sorbet/Granny Apple Green/Memento, cut out with Paper Snips and layer on Granny Apple Green on Front.
- Fold Gingham Ribbon and adhere on top watermelon slices.
- Die-cut circle from Basic White Cardstock with Stylish Shapes Dies, stamp sentiment in Memento and adhere on top of ribbon with Dimensionals.
Let’s Stay Connected:
Join me Live every Wednesday night at 7pm EST on FaceBook or YouTube.
You can Shop My Store Here
Join My Team Here.
#Stampinup #helenkennardcom #Handstampedcards #stampinuptutorials #fancyfoldcards #WatercolorMelonstampset. #Plantedparadisestampset

Leave a Reply